


Tecnical Tips
"This is the zero moment of consciousness. Stuck. No answer. Honked. Kaput. It's a miserable experience emotionally. You're losing time. You're incompetent. You don't know what you're doing. You should be ashamed of yourself. You should take the machine to a real mechanic who knows how to figure these things out.
It's normal at this point for the fear-anger syndrome to take over and make you want to hammer on that side plate with a chisel, to pound it off with a sledge if necessary. You think about it, and the more you think about it the more you're inclined to take the whole machine to a high bridge and drop it off. It's just outrageous that a tiny little slot of a screw can defeat you so totally.
What you're up against is the great unknown, the void of all Western thought. You need some ideas, some hypotheses. Traditional scientific method, unfortunately, has never quite gotten around to say exactly where to pick up more of these hypotheses. Traditional scientific method has always been at the very best, 20-20 hindsight. It's good for seeing where you've been. It's good for testing the truth of what you think you know, but it can't tell you where you ought to go, unless where you ought to go is a continuation of where you were going in the past. Creativity, originality, inventiveness, intuition, imagination..."unstuckness," in other words...are completely outside its domain. "
Robert Pirsiz - "Zen and the Art of Motorcycle Maintenance"

The PCV, Positive Crankcase Ventilation system.
Wiring diagrams
1974 KZ400 Wiring diagram, colour
1976 Lincoln KZ400 D3 Wiring diagram.
1977 KZ400D4 US Wiring diagram
1977 KZ400D4 European Wiring diagram
1978 Z400 B1 Wiring diagram, European, colour
1978 KZ400 B1 Wiring diagram US, Canadaian model, colour
1978 - 1979 KZ400 B1/B2 wiring diagram.
1978 - 1979 Z400 B1/B2 wiring diagram, European
1978 KZ400 C1 Wiring diagram, colour
1979 Z400 B2 , G1 Wiring diagram
1980 Z400 B3/G2 wiring diagram.
1981 Z440 A, D Wiring diagram, European
1981 KZ440 A,D Wiring diagram US, Canada.
1982 - 1983 KZ440 A,D Wiring diagram US, Canada
1982 - 1983 Z440 H Wiring diagram, European.
1980 KZ440-A1-D1 US and Canadian models
1980 KZ440-B1 US and Canadian models
1980
Z440-A1 European models
1980
Z440-C1 European model
1981
KZ440-A2-D2 US and Canadian models
1981
KZ440-B2 US and Canadian models
1981-1983 Z440-A2-A3-D2-D4 (Except US and Canadian models)
1981 Z440-C2 (Except Canadian models)
1982-1983
KZ440-A3-D4 US and Canadian models
Parts diagrams
Note 07.10.2006
Due to some changes on the www.kawasaki.com website the access to the parts diagrams have been changed. Click on the links below and follow this instruction:
When the site opens, just remove the -D3 behind KZ400 (or -A1 behind 440) in the model name box and click on the SEARCH button. Then all the KZ400 models will be listed. Just click on the model you are looking for and the parts lists and diagrams will be available.
At the moment the links seems to be unstable. If you you don't get the parts diagram site directly, click on both links a couple of times and they should work.
Buyers gude
This guide is first
of all written for those who are looking for a running bike. But those who are
buying a bike for restoration might find it handy as well.
General
things to look for
Size
Motorcycles come in a wide
range of sizes. Usually, the tendency is to think of size as a function of engine
displacement. Generally this is true. A 50cc moped is almost certainly going
to be a lot smaller than a Boss Hoss, which fits a 350 CID Chevy small block
into a motorcycle frame and weighs in at about 1100 pounds. But even within
a given displacement there are size variations.
For a beginning rider, a smaller bike is generally best. Something in the 250
- 600 cc range is a good place to start. Remember, though, that a 600 Ninja
is, performance wise, a much faster and more dangerous beast than a 1200 cc
Harley. I know a lot of younger riders are going to want to start with a sport
bike of some sort simply because they look cool. But a cruiser, standard, or
an older UJM (Universal Japanese Motorcycle) is really a better place to start.
You're not going to destroy $1500.00 worth of plastic if your KZ400 falls over
at a stop light, but you could do so very easily on the Ninja.
On the other hand, a 6'4", 220 pound beginner may find a full-sized cruiser
or standard quite comfortable. The only way to be sure is to sit on the bike
and, if you can, ride it far enough to tell if you'll be able to handle it.
Don't be caught up in the "size above all" syndrome, which always
says, "Don't get something you'll outgrow in six months." Not everyone
does. I've been riding a KZ400 for a long time, and it has worked just fine
for me. One of the things you should consider when it comes to size is how you
plan to use the bike. If you're going to be carrying a passenger most of the
time, a larger displacement bike makes sense. If you'll be riding solo, on the
other hand, you need enough power to handle highway speeds comfortably, and
ergonomics that fit your body. If you can get those in a lighter bike, don't
worry about someone who figures you're going to find the potential to hit 175
mph of vital importance in a few months.
Paperwork
Be sure that all paperwork
is correct and in order. The serial/engine numbers or VIN should match what's
on the title. Be suspicious of any bike that doesn't have a title.
And at last:
You should always bring along a friend, or another person you trust, and who
has got a fair amount of knowledge about motorcycles. It is one of the best
insurances you get. Both for a second opinion, before you make a decision, and
as a witness if necessary.
The (K) Z 400/440
Wheels
Check the wheels for run
out. Also check the wheel bearings for free play by grabbing the wheels at their
highest and lowest point and try to wiggle them back and forth.
Chain and sprockets
Check the chain wear by checking the chain adjusters. If they are used up, the
chain is worn out. Also check it by lifting it off the rear sprocket on the
rear of the sprocket. If you have more than ½ teeth between the chain
and the sprocket, it is worn out. Also check the teeth on the sprocket. They
should not be bent, or have signs of uneven wear. Then check the rear coupling
bearing for free play by wiggling the rear sprocket, and the rear coupling dampers
by engaging first gear and move the wheel forth and back in the drive direction.
Tires
When you're inspecting
your prospective ride, tires are a good place to start. Don't just look at the
amount of tread remaining. Old tires that will disintegrate in the first 50
miles may have plenty of tread. If the tires are obviously dried out, or have
cracks in the sidewalls, either try to get new ones installed or get the price
reduced enough to pay for a new set. You can tell how old a tire is by looking
at the last three numbers in the DOT Code on the sidewall, which indicate the
week and year the tire was manufactured. (507 indicates a tire made in the 50th
week of 1977, 87, or 97 -- you have to figure out the decade for yourself. It
probably won't be earlier than the one the bike was made in, and it also won't
be any later than the last time it was ridden.)
Suspension
Check the fork tubes for
rust pitting, and the fork seals for any leaks. Check the fork for smooth operation.
If the fork is binding, you might want to look elsewhere. Make sure the rear
shocks and springs are functioning properly. Also, make sure that the head bearings
in the fork operate smoothly, and without any play. With the front wheel off
the ground and someone holding the handlebars firmly, try to move the fork.
There shouldn't be any obvious play. If you have access to a mechanic's stethoscope,
rotate the wheels and listen for bearing noises.
Also check the rear swing arm for free play. With the bike on the centre stand,
grab the wheel at the rear and push the wheel sideways back and forth and look
for free play in the swing arm pivot.
Brakes
Rotate the wheels and operate
the hand and foot brakes. If a drum brake is binding, find out why. If the problem
is lack of lubrication on the cam shaft, the problem is easily fixed. If something
is broken it can get more expensive, so you need to know which.
Look at the brake fluid through the reservoir sight glass. Straw colour is normal,
muddy brown means the fluid is contaminated and will have to be replaced. Too
much crud in the brake fluid can cause the callipers to drag by preventing the
pistons from fully retracting. Look at the brake lines, too, to make sure they're
not about to burst or disintegrate with age.
Cables
Make sure that none of
the cables are binding. Check where they attach to the levers for any sign of
fraying. If you can see the other end, check that as well. If the cables are
rusty, figure they'll need to be replaced.
Engine
This is another place where
that mechanic's stethoscope is going to come in handy. The first thing to check
on the engine is, of course, whether it will start. Listen to the starter, if
there is one. Or note how many kicks it takes to get the engine going. If the
bike has been sitting for a long time, just getting it started can be nearly
impossible. Gasoline in the carburettor(s) will turn into hard varnish over
time, and gas in the tank will deteriorate into something that doesn't burn
very well. Also beware of rotten vacuum piston diaphragms on the 400B and 440
model carburettors. These are expensive to replace, and if they are cracked,
it will reveal itself by a lack of top end power in all gears.
Iron block engines can rust up if enough moisture can get inside the cylinders.
Mice like to make their nests in old bikes, and will chew up some of the softer
parts in the process. With the engine running, get out the stethoscope and listen
carefully. Motorcycle engines are pretty noisy inside, but some noises are a
lot more ominous than others. Bad bearings will make a distinctive noise. So
will other parts that have worn beyond tolerance. If you're not sure how to
tell the difference between a $3.50 noise and a $1500 noise, take someone with
you who does. Also check for heavy vibrations in the engine. These engines will
have some vibrations, but it should not be excessive. If it is, the crank balancer
chain might need to be replaced. It’s an engine out job. And check for
excessive exhaust smoke. Bluish smoke and/or the smell of burnt oil can indicate
worn piston rings, or leaking valve stem seals.
The clutch basket and primary chain will make some clatter at idle. That is
normal for these engines.
Also check the engine oil drain bolt, and the oil filter cover bolt, under the
engine, in the bottom of the crankcase. If the bolt heads are rounded, it can
be difficult to get it out for oil changes, and it tells you about how the bike
has been maintained. Also check the oil level and the colour of the engine oil
through the oil level sight glass on the right side of the engine, low down
on the right side engine cover. The level and the colour of the oil will tell
if the oil has been changed in time, and if the owner has been running the engine
with the correct oil quantity.
Electrical System
Check all lights and switches
for proper functioning. Make sure that the kill switch actually shuts off the
engine. (You will sometimes find bikes where an owner has bypassed the kill
switch for some unfathomable reason. 99% of the time this doesn't mean much;
the other 1% not being able to shut off the bike in an emergency can kill you.)
Take a good look at the wiring harness for workarounds and non-standard fixes,
since electrical problems can crop up unexpectedly. And check if the charging
system is working. Let the bike idle and be sure the head light is on. Rev it
to 2500rpm a couple of times while you watch the headlight. It should brighten
up a little. It is even better if you bring along a voltmeter, hook it up across
the battery terminals, and check the reading. At 1500 rpm you should have 13,
5~14, 5 volt. Then raise the rpm to 3500. You should have the same reading.
Exhaust System
Take a good look at the
exhaust system, because replacing one is expensive. You're looking for leaks,
and you find them the same way you find leaks in an automobile exhaust. Use
a rag to partially block the tailpipe with the engine running and see if anything
leaks. If the system is stock, look out for rusted pipes/mufflers and rotted
baffles.
Also, make sure that the exhaust system on the bike is actually legal. There
are decibel limits in nearly all jurisdictions now, and too much noise can get
you a ticket. Baffles should be intact. If the pipes are marked "race only,"
see if the seller has the originals. (Unless you plan to use the bike only on
the track.)
Fuel system
Check the fuel tank on
the inside for rust. At the same time check the condition of the fuel cap gasket.
Also check for any fuel leaks from the bottom of the fuel tank, the petcock
or the fuel lines.
Cosmetics
This is really the least important part of buying a used motorcycle, but most buyers are going to be concerned with it. And the appearance of a bike can give some good clues as to how well the rest of the machine was maintained. Mostly, what you're looking for here is that the paint is intact, and that any chips have been taken care of before something starts to rust. Chrome should be shiny, or at least not covered with rust. Cracked upholstery can be replaced cheaply, but if the foam is also damaged the cost is going to go up quit a bit. And check the seat pan. It is made out of steel and it can be destroyed by rust.
Downloadable Buyers Check list
Service and technical tips
![]() Polished engine covers left
Polished engine covers left
 Polished engine covers right
 1979 B2 Engine
 1982 KZ440G engine
 KZ440 Belt drive
 Starter clutch
 KZ400 Service Specifications
 1975 KZ400S Service Specifications
 1974 KZ400 Service Specifications
![]() KZ400/440 tune up specifications
KZ400/440 tune up specifications
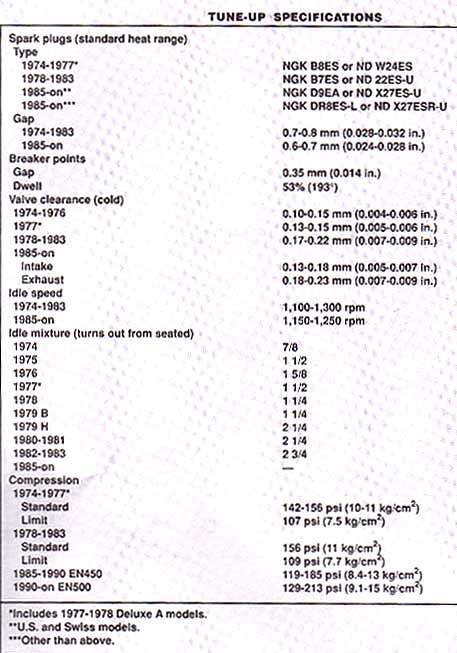 KZ400 and 440 tune up specifications.
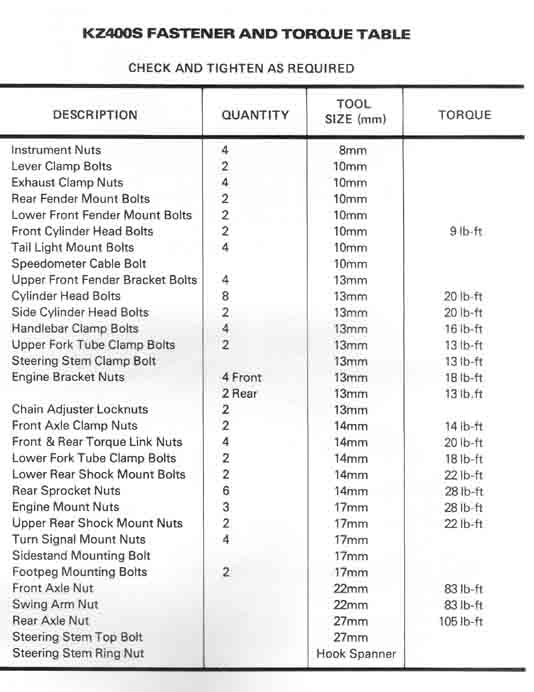 Torque Table
![]() Wear limits 1
Wear limits 1 ![]() Wear
limits 2
Wear
limits 2 ![]() Wear
limits 3
Wear
limits 3 ![]() Wear limits 4
Wear limits 4
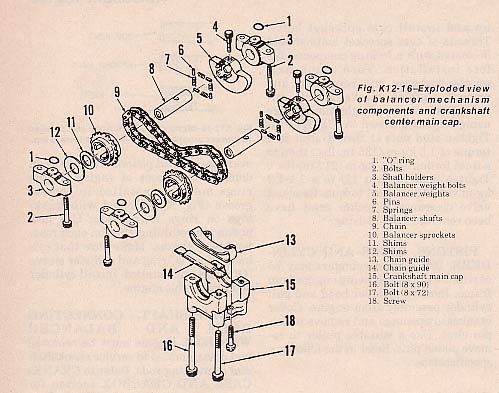 Balancer Mechanism 1
  Balancer 2
  Balancer 3
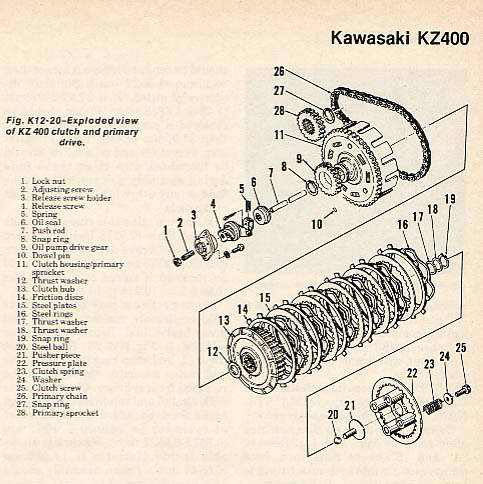 Clutch and primary drive.
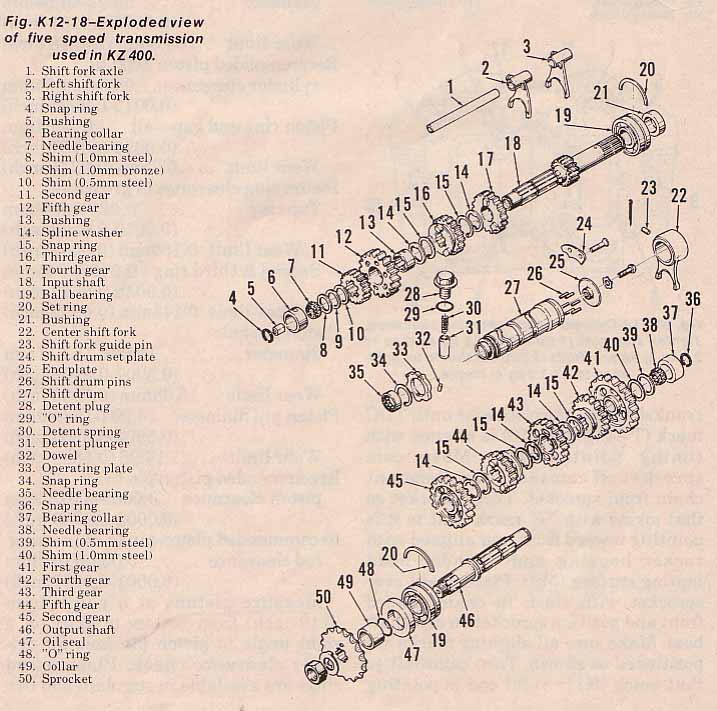 5 speed transmission
 Kick starter assembly
 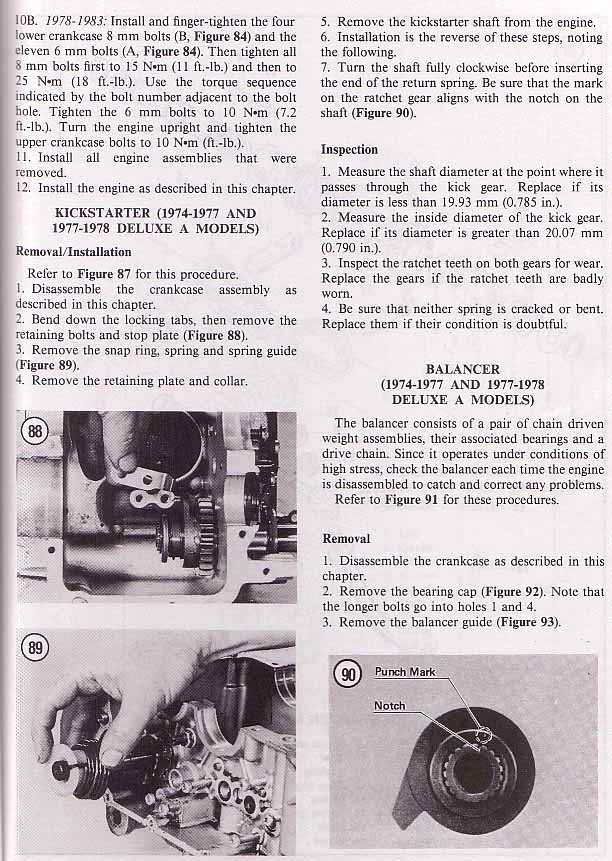 Kick starter
 Brake caliper
![]() Disk brake master cylinder
Disk brake master cylinder
 Periodic Maintainance Chart
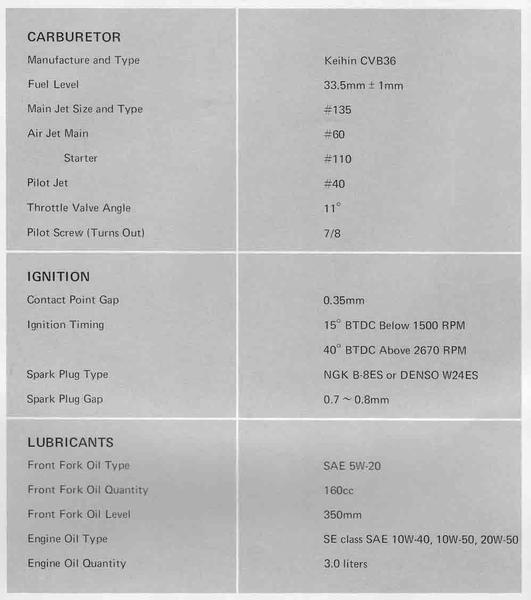
![]() KZ400/440 carburetor specifications
KZ400/440 carburetor specifications
 1974-1976 idling adjustment
 Idle adjustment
![]() Float system.
Float system.
 Carbs 1974-1976 and 1977 A
 1977 D4/1978 A2 Carbs
  1977 Carbs
![]() 1977
Carburetor construction
1977
Carburetor construction ![]() 1977 Carbs specifications
1977 Carbs specifications
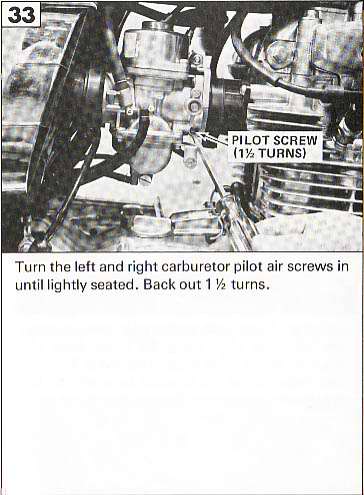
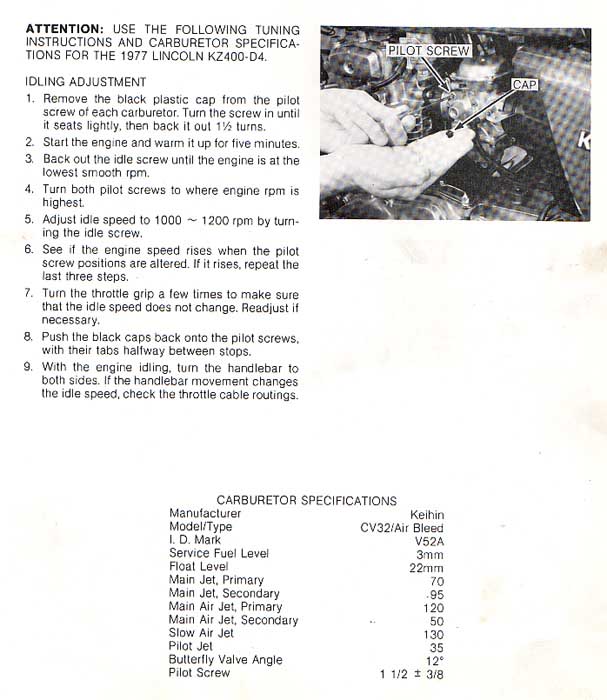 Adjusting 1977 KZ400 D4 carbs
 1978-1981 KZ400 Carbs
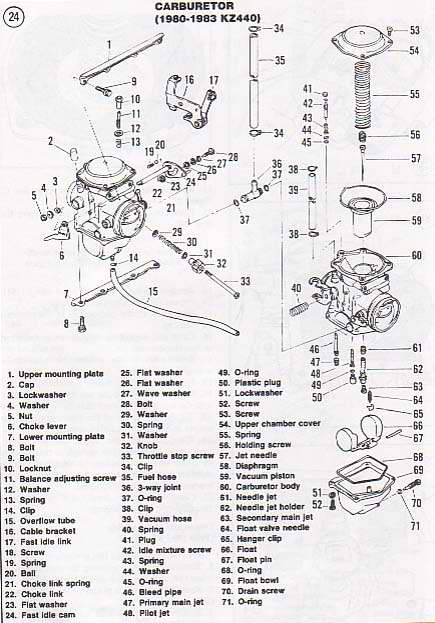 1980-1983 KZ440 Carbs
 Steering stem assembly and front fork
 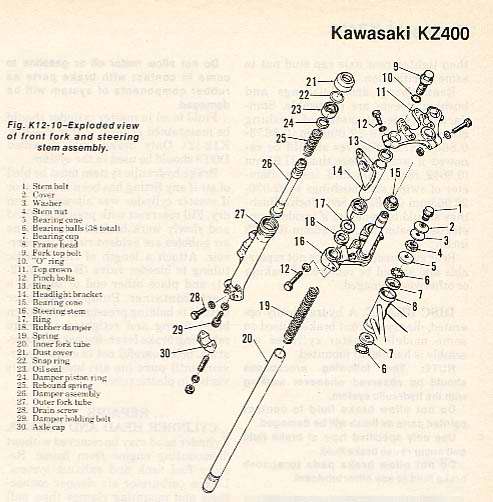 Front fork
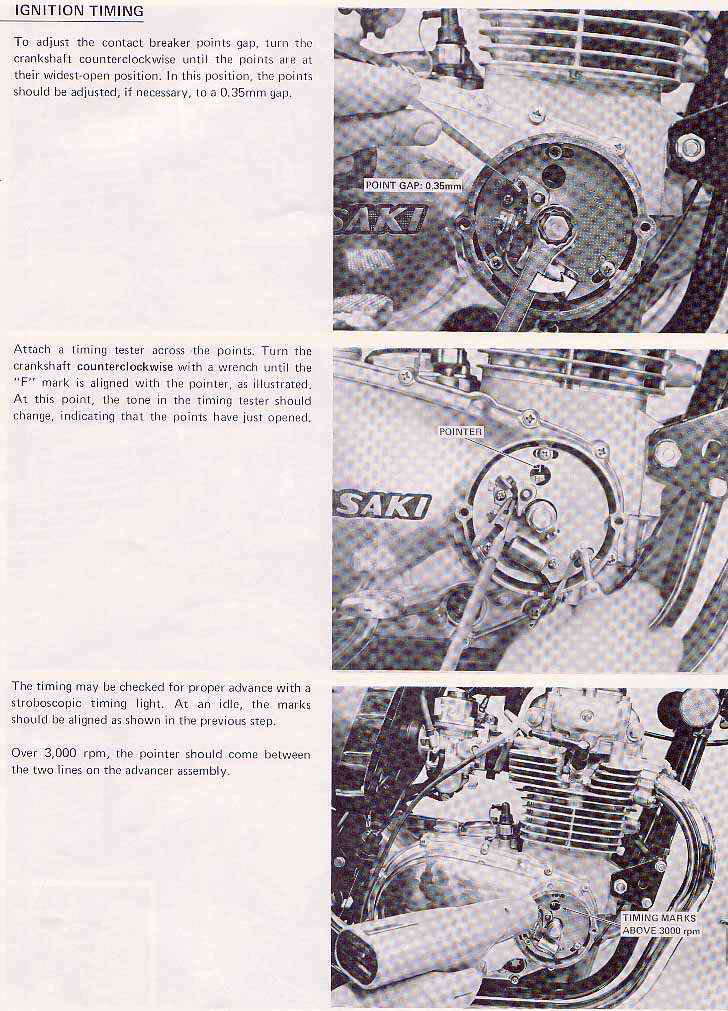 Ignition timing adjustment.
![]() Camshaft alignment marks.
Camshaft alignment marks.
 Threads and torque table
 Starter, starter clutch, starter relay
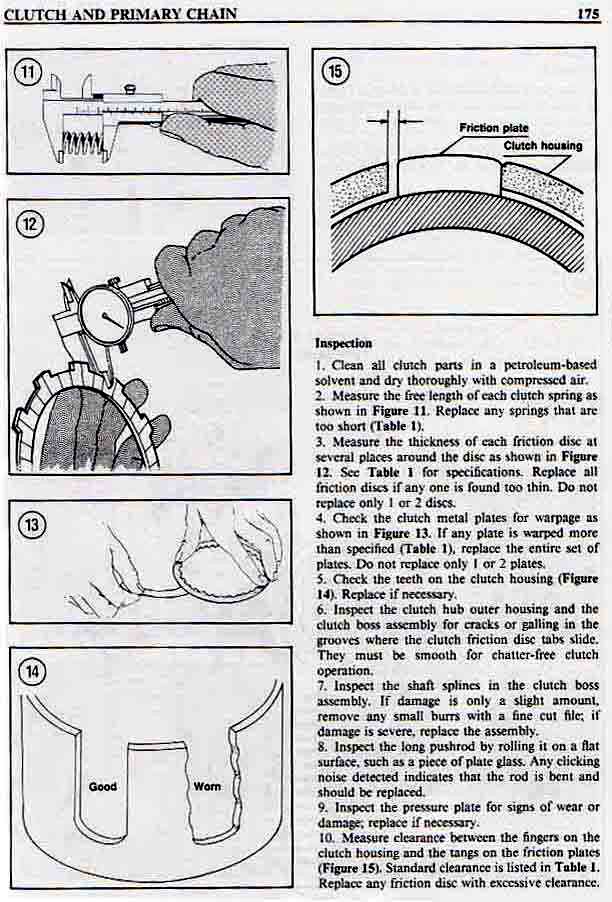 Clutch inspection
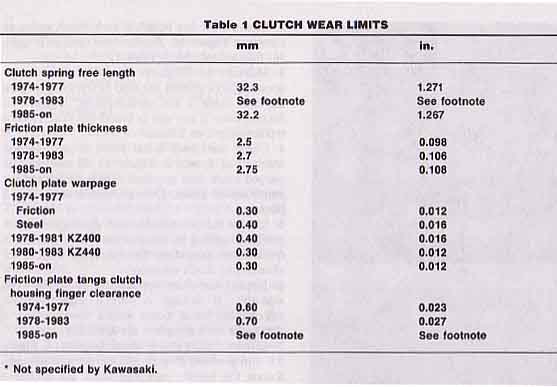 Clutch wear limit
 Tuning tips
  Tuning tips
 ![]() Tuning tips
Tuning tips
 1974-1977
Rear hub
1974-1977
Rear hub  1974-1977 Front hub 400 D
 Front hub 400S,C
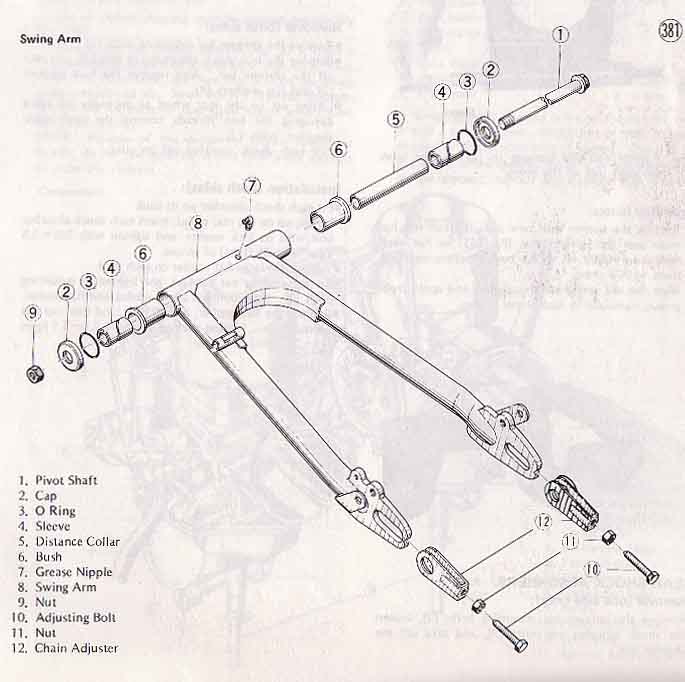 1974 - 1977 Swing arm
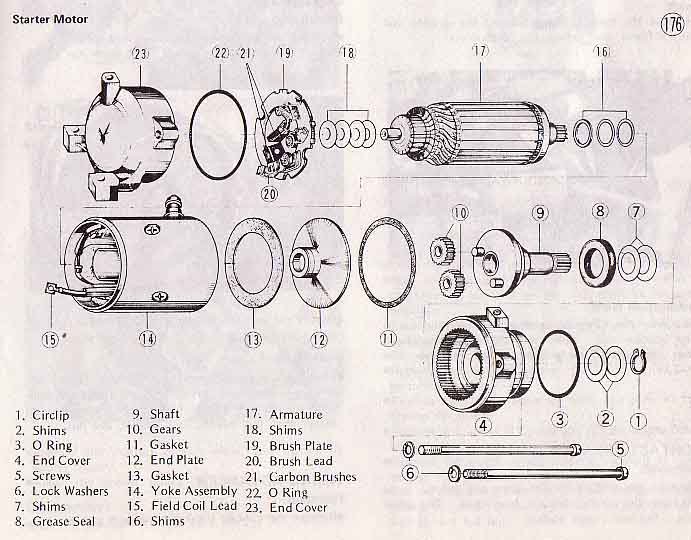 1974-1979 Starter motor
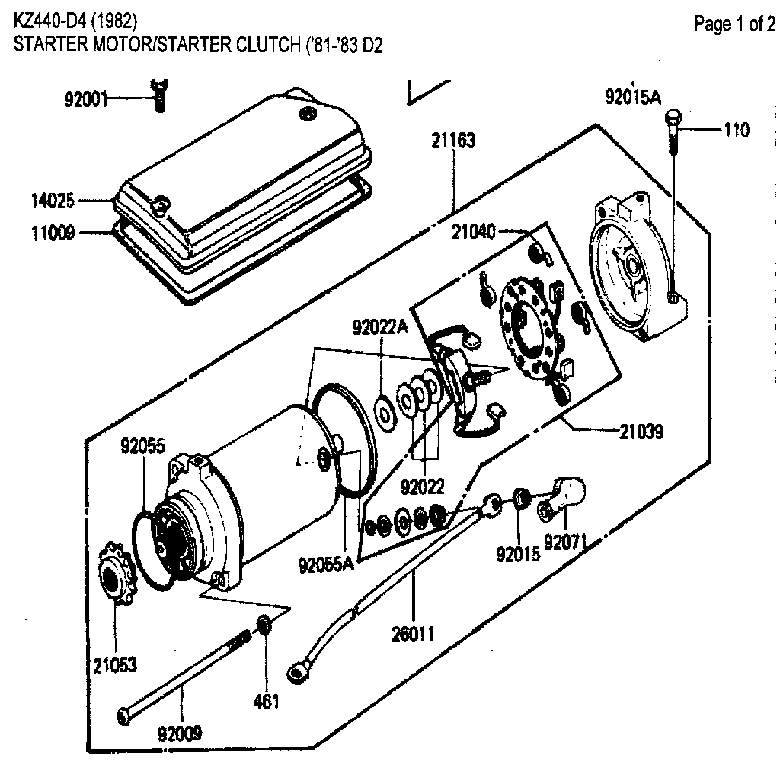 1980-1983 KZ440 starter motor
 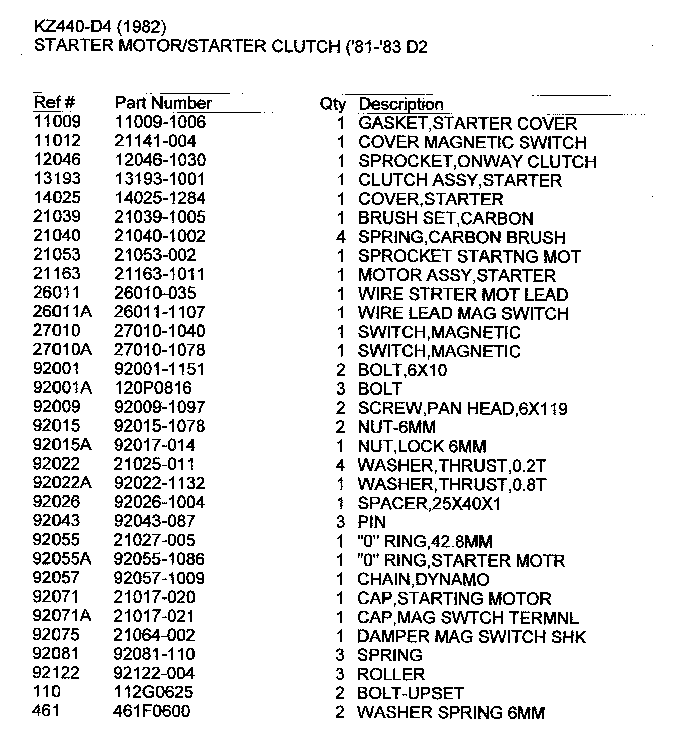 KZ440 starter parts list
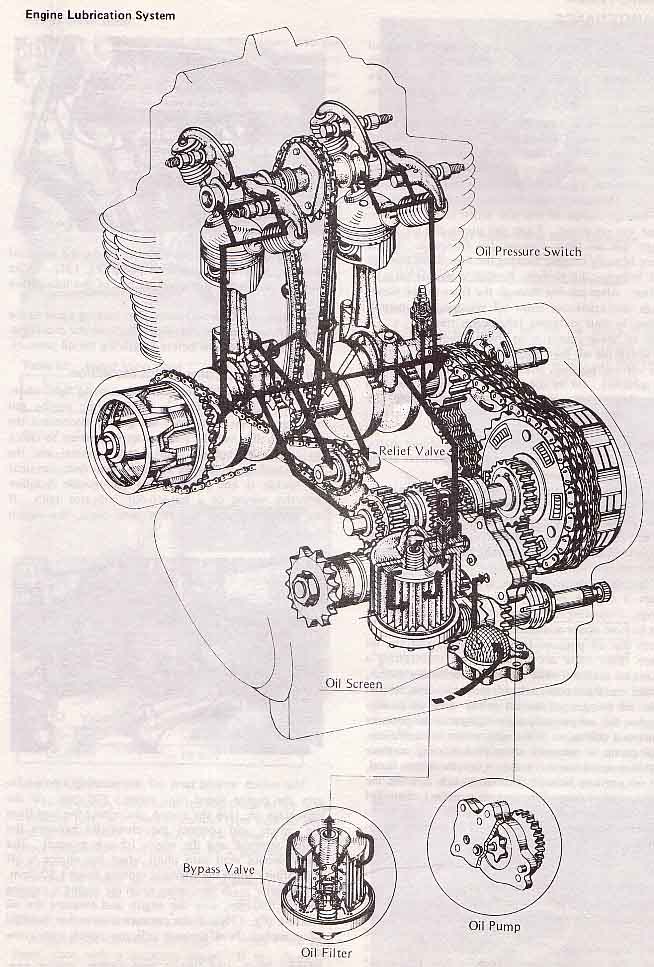 1974-1977 Engine lubrication
 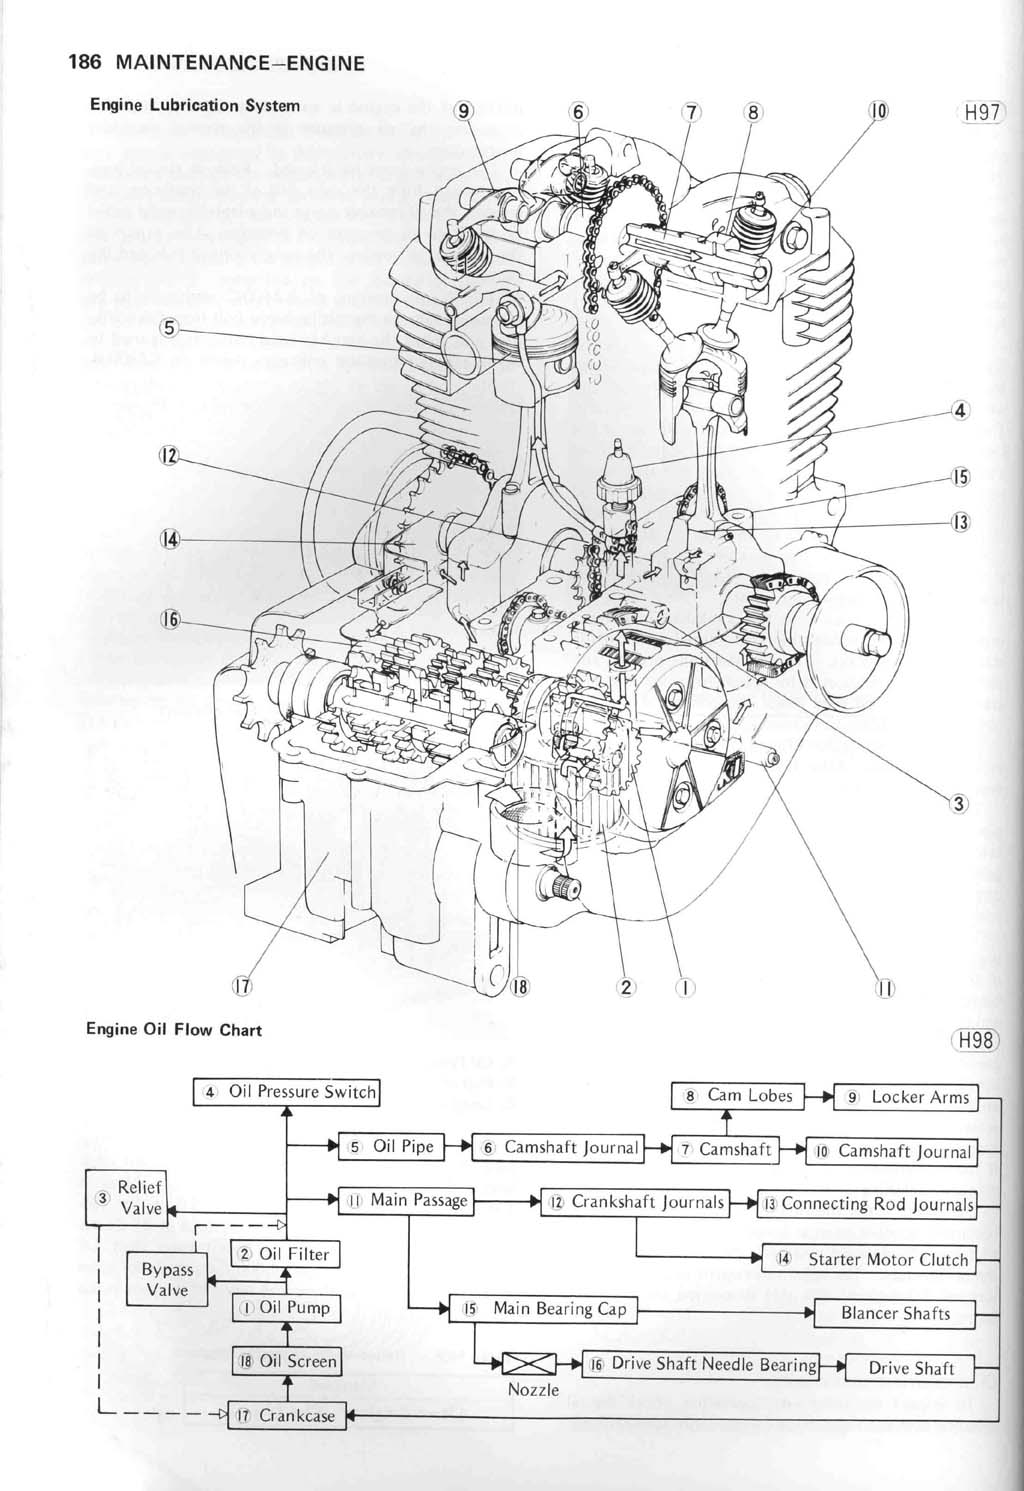 1978-1983 Engine lubrication
 Charging system Page 1
 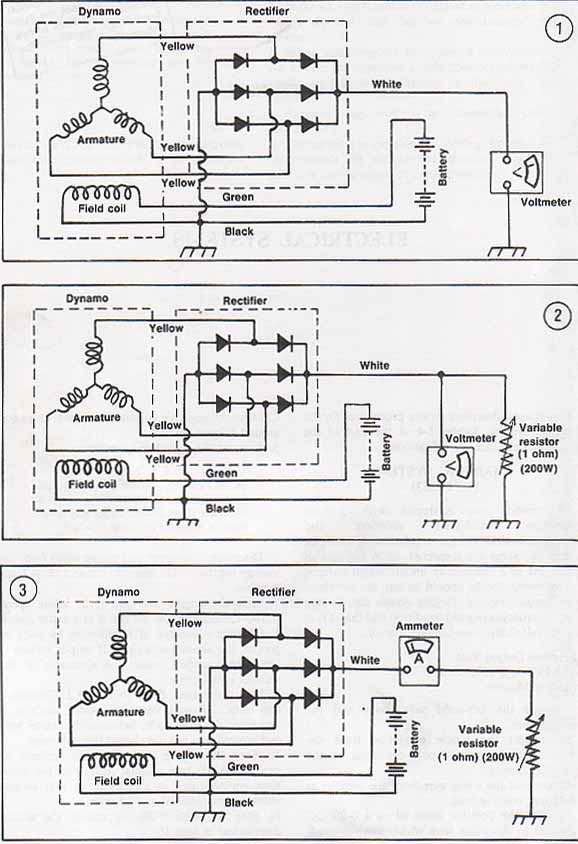 Charging system Page 2
  Charging
system Page 3
Charging
system Page 3 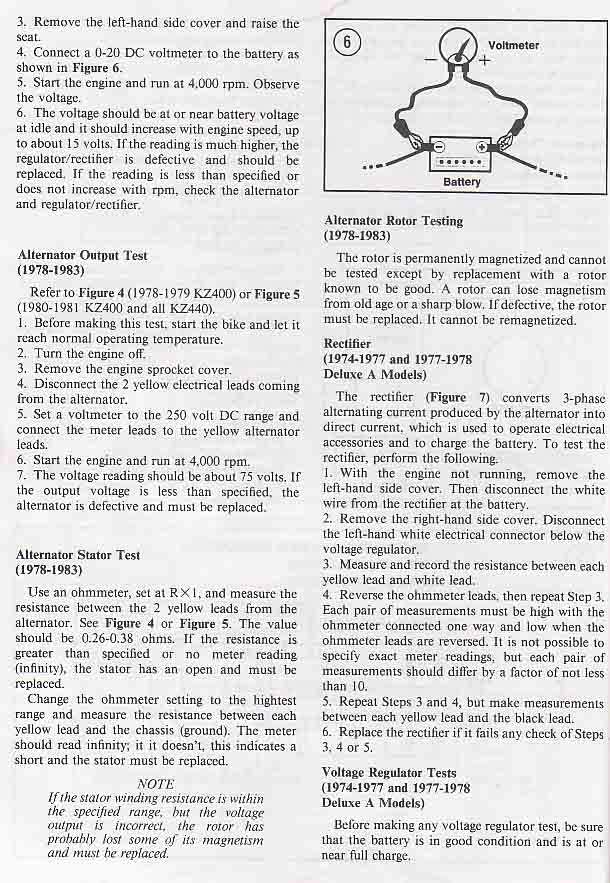 Charging system Page 4
  Charging system Page 5
![]() Head light circuit
Head light circuit
![]() Brake light circuit
Brake light circuit
![]() Turn signal circuit
Turn signal circuit
![]() Transistorized
ignition system (1981-1983)
Transistorized
ignition system (1981-1983)
![]() 1974-1976 carb balancing 1
1974-1976 carb balancing 1 ![]() 1974-1976 carb balancing 2
1974-1976 carb balancing 2
 1977 carbs 2
 1977-on carb balancing
 Cylinder head tightening sequence
 Special tools 1
  Special tools 2
 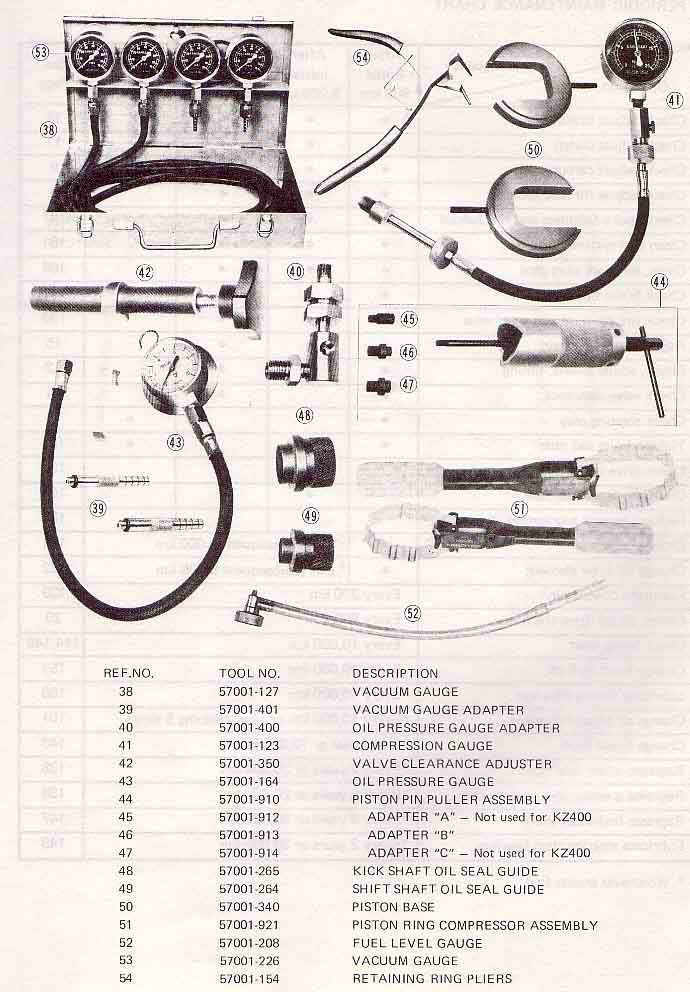 Special tools 3
 Headlight aim
 Performance
Maintainance.
These tips are based on my own experience as a long term owner of a KZ400. I'm not a professional mechanic, I have a limited workshop space, and most of my tools are the tools owned by most average home mechanics. But I have always maintained the bike myself, and most of the work on these bikes can be done by a home mechanic, and on a limited working space.


When it comes to repairing
and maintain the KZ400, the issue are too big to be fully covered in one page.
There was a number of model changes during the production period and my own
experience are with the early 1974-1977 models. And some of my tips will be
a result of that experience. Other tips will be useful for all models I hope.
But since I'm not a professional mechanic I feel that I don't have the skills
needed to write a repair guide. That is fully covered in the workshop manuals
that already exist. There are a few things that are important to remember that
I will point out though. The rest I will cover with links to a few web sites
that I think will cover most of the repair of the bike.
There is one important thing to have in mind though. The engine construction
is the same for the 1974 - 1977 models. For the 1978 models the top end was
changed and the engine got a new cylinder and cylinder head, and they can not
be interchanged with the ones from the 74 -77 models.
The KZ400 are an easy bike to maintain as long as you know what you are doing.
The starter, the generator and the clutch are easy to get at, and you can overhaul
the top end without taking the engine out of the frame. Also the rear wheel
can be removed without dismantling the mufflers or disturbing the chain adjustment.
Also replacing the front fork seals and changing the oil in the front forks
is a straight forward job. Changing engine oil and replacing the oil filter
are another easy job. All in all, a periodic service can be done whiten a couple
of hours.
But before you start I will recommend that you buy a Kawasaki workshop manual,
and/or a Clymer manual that covers the model you have. You will need one for
the service specifications. They will cost about the same as a 2 hours job at
a motorcycle workshop.
Another thing that I have done trough the years is keeping a diary. Every time
I do something with the bike, any adjustment or repair, or replacing parts,
or whenever I see or hear something worth remembering, I write it down in the
diary. And then if something happens, or when I adjust or replace something,
I can always go back and read my notes. That can be very helpful sometimes.
And I recommend that you follow the service and oil and oil filter changing
intervals rigidly. And that you use good quality oil. I replace the oil filter
every time I change the oil.
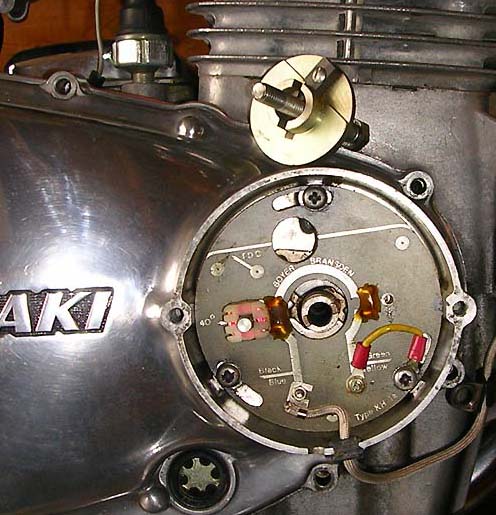
I have replaced all the wheel bearings with the enclosed type. I also replaced
the point’s ignition with an electronic ignition system from Boyer Brandsen.
Once the ignition is set you don't have to adjust it any more.
Just a tip for buying points, if you have a problem getting the ones for the
KZ400, you can buy points for a Honda 550/750 four. They are the same.
Another thing I have replaced on my bike is the brake light failure unit. And
I discovered that you can use one from the KZ650. And I think the unit from
a Z1/KZ900 will fit also.
Also the fuel tank cap gasket is the same for the KZ400, 650 and 900.
When it comes to tyres there are a lot of brands and types to choose between.
Personally I have tried several, and I have gone up from 3.50" to 4.00"
on the rear tire. I think that makes the bike more stabile. But it does make
it harder to rev the bike out on 5.gear. Now days, I'm using Dunlop K82 on the
front wheel, and Dunlop K70 on the rear. For those who want to use modern tires
you will find a conversion chart here.
And here you will find out how to replace tires yourself.
Repair and maintanance tips
Kindly provided by Mark Shively, Motorcycle Tech at www.allexperts.com, Motorcycle Repair Category:
Links to tips about repairing and maintaining
General repair and maintainance
http://www.bikerworld.co.uk/tech/old_tech.html
http://www.users.bigpond.com/jack_stands/motorcycle_advice/bike_repair.html
KZ 400 repair tips
http://www.kzrider.com/forum/forumdisplay.php?fid=5
General KZ repair and tech tips
Articles about engine oil
http://www.yft.org/tex_vfr/tech/oil.htm
http://www.bestsyntheticoil.com/amsoil/reformulated.shtml
http://www.bestchoice-car-care.com/motorcycle-oil.html
http://www.ducatimeccanica.com/oil.html
How to replace corroded spark plug wires
http://www.kzrider.com/plug_wires.shtml
More repair tips
http://www.motocross.com/motoprof/moto/mcycle/mcycle.html
And Classic Motorcycle Mechanicscovered a KZ400 engine rebuild over three issues from December 2002 to February 2003. Back issues can be bought here: Back Issues.
Parts
Parts are sometimes easy to find, and some parts are harder to come by. In general, there are still a lot of suppliers that can supply a lot of parts for the KZ400, but prices can be high. An alternative will be to search for parts on online auctions like EBay. There are a couple of suppliers that have specialized on parts for old KZ's: Z-power in England and Australia, and Klasmo bikes in Germany. You will find links to part suppliers on the Links page.
Parts list.
It is recommended that you have a parts list for your bike, because suppliers are going to ask for the Kawasaki parts number when you are ordering parts. But if you do not have it, you will find it online at kawasaki.com. Go to "View parts diagram" and search for your bike. Just remember, if you have a KZ400 older than 1976, search for the 1976 model diagram any you will get diagrams for the 1974 and 1975 as well.
This is the list over all available Classic Kawasaki parts from Z Power, Australia: Parts List
Air filters.
The air filters for the 1974 - 1975 models are hard to come by, and the price is high. But since they are made out of steel plates with a paper element between those plates, they can be rebuilt. I did this my self some years back and it does work. The trick is to find the right type of filter paper to use. The prosess is described here : A breath of fresh air


An alternative would be
converting to pod filters, but that will also involve re-jetting the carbs since
the mixture will be leaner with pod filters. Jets for the carbs on the 1974
to 1976 models are not easy to find, but //www.bikebandit.com
still have them listed. It is the main jet that needs to be increased. Another
issue when converting to pod filters are the crankcase breather hose that goes
in to the original air box. This can be routed backwards with a longer hose,
or you can buy a breather filter which is the more expensive solution.
Both KN
and Emgo
are producing pod and breather filters.
Spark plugs.
Reading the spark plugs can tell a lot about the engins state of tune and wear. Here you can see how it is done and you will also find colour images for comparison. You can learn about the NGK spark plug codes here.
Exhaust pipes and mufflers
The pipes and muffler units
for the early models are rare to come by as NOS (Now Old Stock) parts. They
have been up for sale once in a while on EBay, but the price gets high. BikeBandit
have got a left side unit listed at a price of $481. An option here will be
to use an aftermarket system. Mac
is producing both 2-1 and 2-2 aftermarket systems. There are also other producers
that are making those. If the down pipes are useable there are also several
aftermarket universal
mufflers that can be used. Many dealers have got aftermarket systems for
the KZ400 listed.
But again as with the pod
filters, since some of the aftermarket systems are less restricted than the
original system, it could involve re-jetting the carbs.
Polishing engine covers.
When I polish the engine
covers, I use Solvols Autosol. That is a very good chrome and aluminium polish.
I always polish them by hand. And to preserve the finish, I polish them with
Turtle Extreme car wax.
If the covers are covered with oxide I use wet sanding on them, beginning with
grade 400, then grade 600, grade 800 and finally grade 1000. I use a lot of
water and try to sand as light as possible. And finally I polish them as described.
You can see the result on the pictures at the top of the page.
Valve timing for the 1974-1977 camshaft

Piston rings

Valves and camchain adjustment


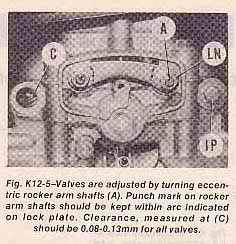
Valve clearence adjustment for the 1978 and on 400, and the 440 models
Remove the fuel tank, the
spark plugs, the ignition timing cover from the right side of the engine, and
remove the 4 valve adjusting caps. Then turn the engine counter clockwise with
the 17mm nut on the end of the crankshaft. (Do not use the 13 mm bolt) Watch
the right hand intake valve (the rear valve) moving down (opens) and up (close)
as you do. When the valve are up (closed) continue to turn the crankshaft approx
1/4 turn until the T mark on the ignition advance mechanism aligns with the
index pointer on the primary cover (located behind the advancer mechanism and
the points plate/timing plate).
Now you can measure the valve clearance on both the intake and exhaust valve
on the right hand cylinder. When the clearance is correct you will feel a slight
drag when you insert and withdraw the feeler gauge between the rocker arm and
the valve stem.
Adjust if necessary by loosing the locknut on the adjuster screw, and adjust
the clearance with the adjuster screw. Be sure to hold the adjuster screw steady,
and tighten the locknut securely when done.
When you are done with the right side cylinder, turn the crankshaft one full
round till the T mark aligns with the index mark again.
Now you can repeat this procedure on the valves on the left hand cylinder.
Clutch
and clutch cable adjustment


Note: This is the adjustment procedure for the 1974-1977 D and S engine release mechanism. For the 1978 and on engines with the release mechanism on the left hand side, turn the screw in till it is loose, then turn it out till you can feel a resistance, and then 1/4 turn in again, and fasten the lock nut. The cable free play should be adjusted the same way as for the early models.
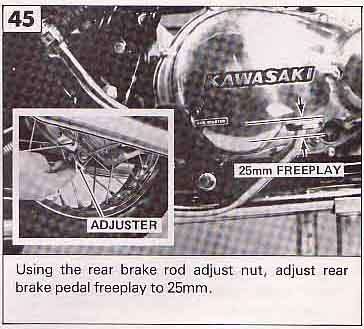
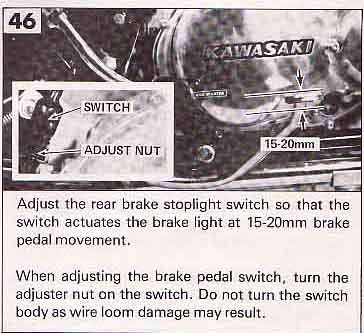
Rear brake adjustment

Disk brakes
About
brake pads and brake shoes
Many models share the same
brake pads and brake shoes. Also the KH250, KH400 and S3 triples used the same
brake shoes as the 1974 to 1977 KZ400. And all the KZ400/440 with a front drum
brake shears the same brake shoes. The rear brake shoes are the same between
1974 and 1977. And the 1978 rear brake shoes were used all the way up to 1983.
The brake pads are the same for the 1974 and 1975 models. The 1976 and 1977
models and the 1978 A2 models used the same pads. Then a new type was used on
the 1978 and 1979 models. Then with the 440 models in 1980 there was used a
third type of brake pads. Most of the 440 models used this type. It was only
the 440 A5 that had a fourth type of brake pads. And this also points out that
there will be several types of brake callipers used on the 400/440 models.
Front
Calliper KZ400D
Note:
On the 1974-1977 models there were tow different callipers used. You will find
a diagram of both below. However, there is no way to tell which calliper that
was used on which bikes. The brake pads are the same, but the way they are mounted
to the calliper is different between the two.
(Click to enlarge)


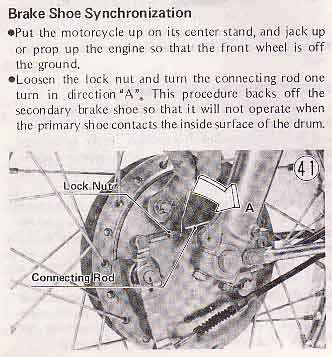
Front Drum Brake - Brake shoe synchronization


Trottle cable free play adjustment (dual cables)


Note:
If the adjustment range
is entirely used up at the throttle grip, use the adjusters at the carburettor
end of the cables to create slack in the cables.
Carbs

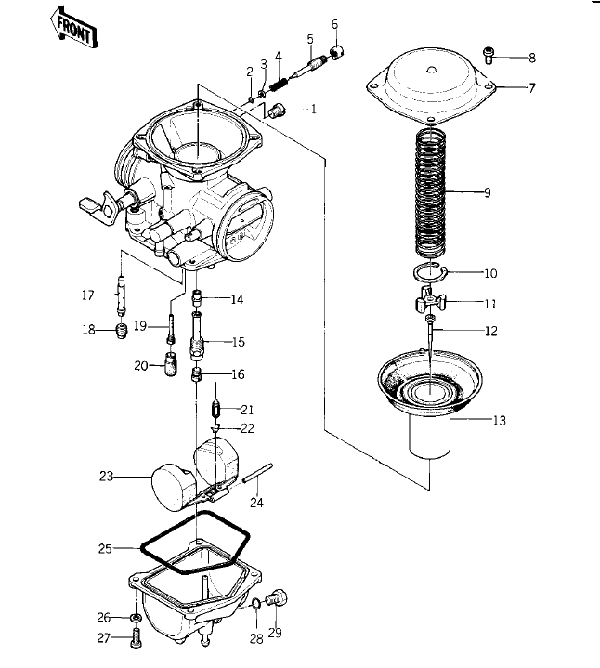
And the complete list for the 1974-1979 KZ400 carbs can be found here.
And this is where you can find the carb type number (click on the image to enlarge):

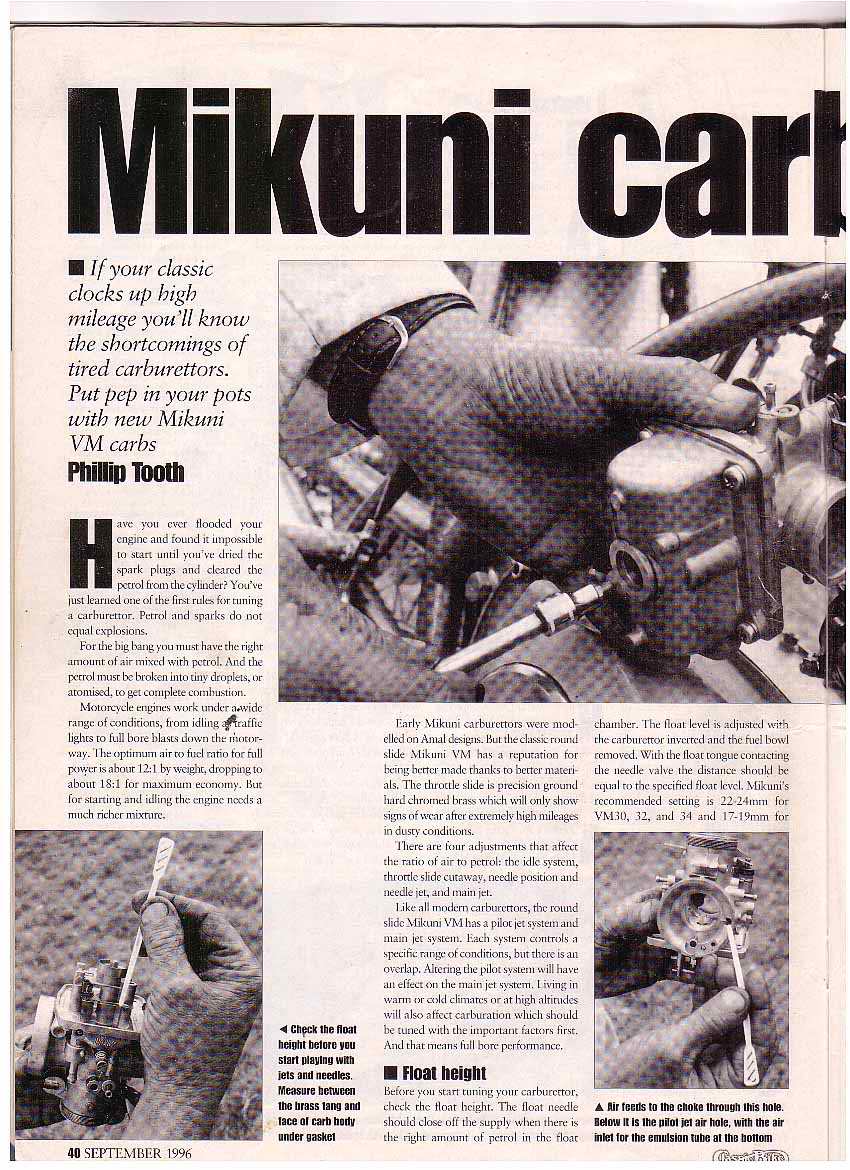
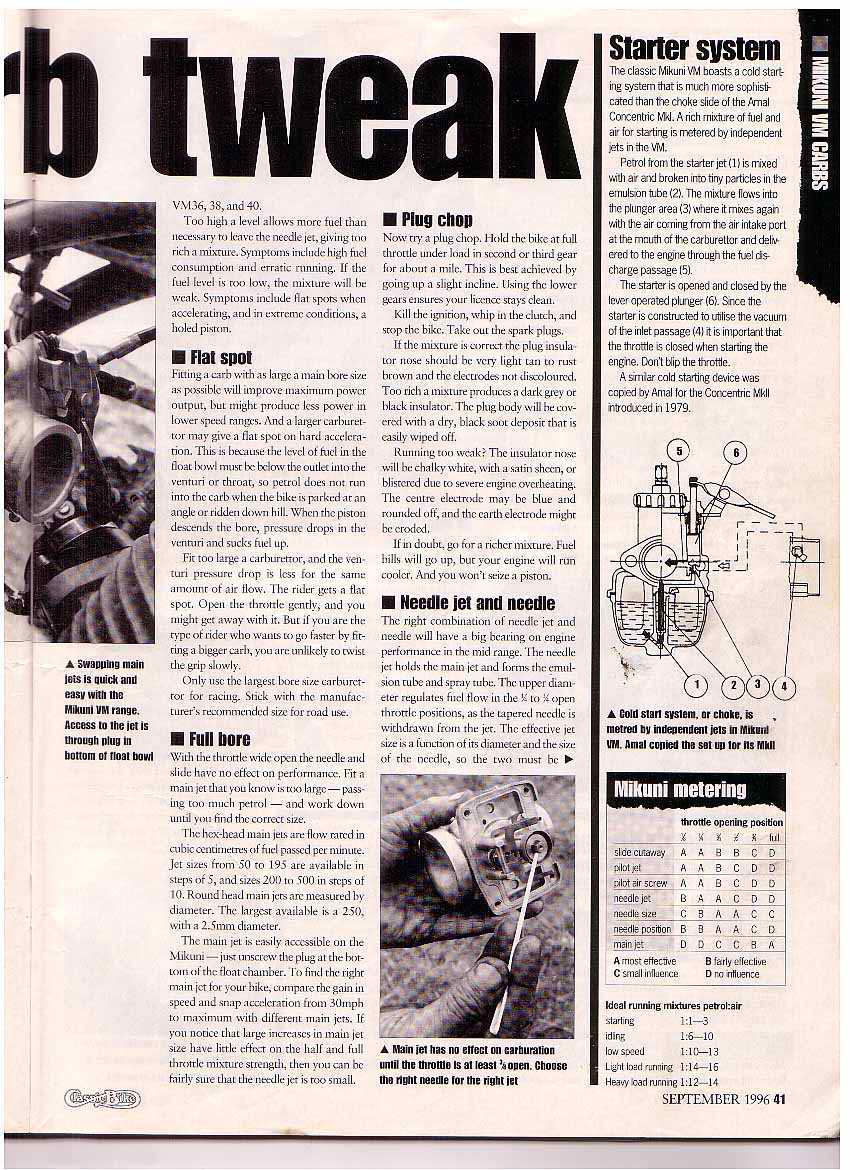
About jetting and adjusting carbs. This is written for the Mikuni slide carbs, but many of the tips can be used for the CV carbs as well.
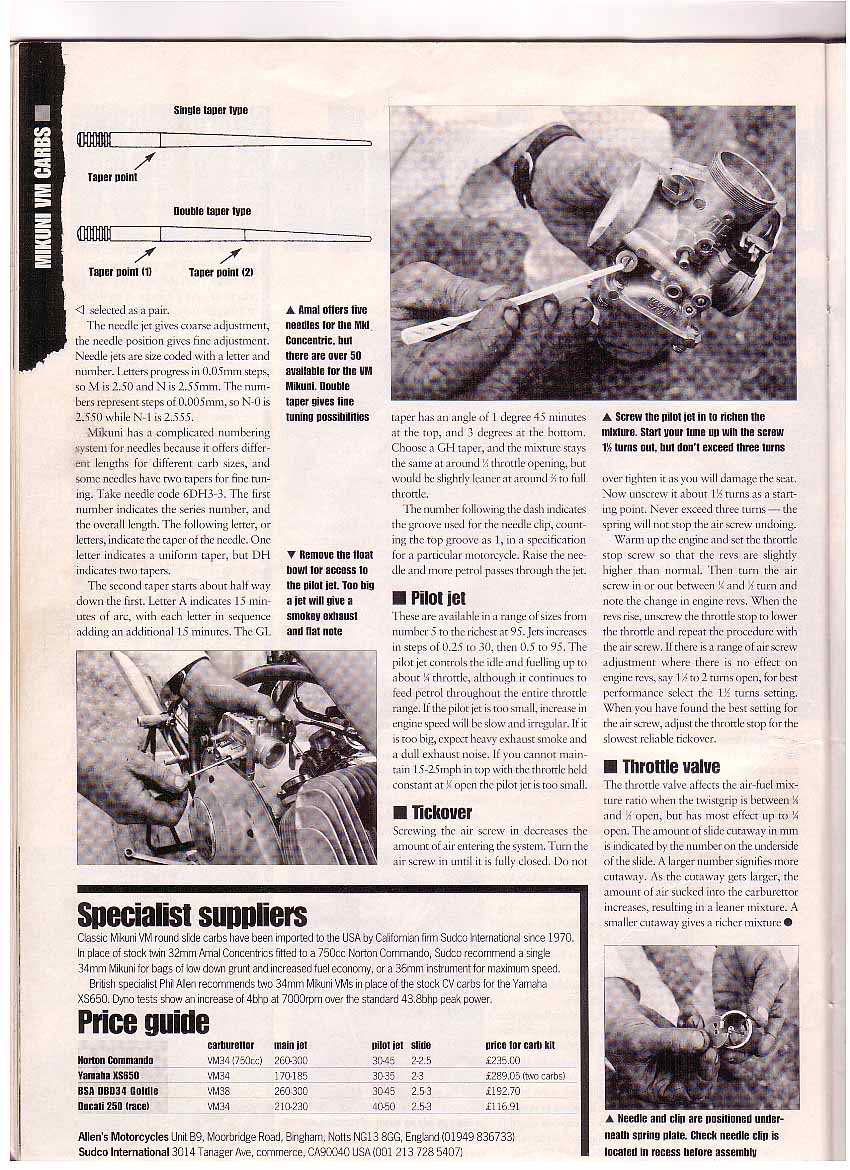
Many of the questions I
have seen regarding poor running are related to the carburettors. Cracked diaphragms,
clogged jets, fuel level adjustment, clogged fuel lines and balancing are the
most common problems. And the jetting problem when pod air filters and/or aftermarket
exhaust are installed. Before any carb adjustments are done, the ignition and
the valve clearances should be adjusted, and the spark plugs should be cleaned
or replaced. And on the 1974-1976 carbs you should also check that the o-rings
on the main jets and the rubber plug covering the pilot/slow jets are making
a sufficient seal.
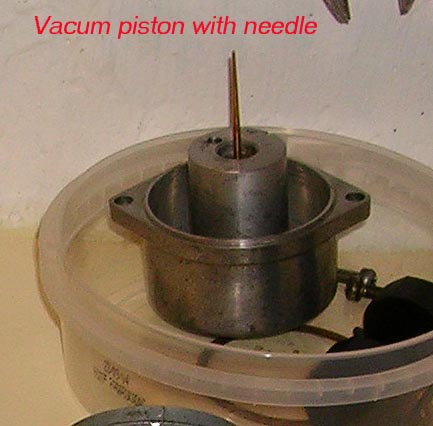
A tip about the vacuum
pistons in the 1974 -1976 carbs. To make a better seal between the piston and
the cap, smear a thin layer with synthetic two stroke oil on the grooved part
of the piston (the red arrow on the picture). Just be careful and don’t
use too much. Put the pistons in to the caps and move them up and down. Then
take them out and dry off the excessive oil.

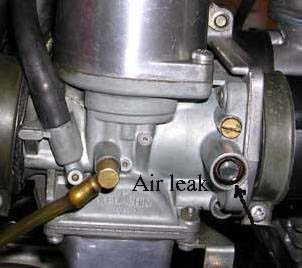
There is also one more thing that can be a problem with the 1974 - 1976 carbs. You can get an air leak when the bushing for the butterfly valve shaft gets worn. This will make it difficult to adjust the idle mixture, and balancing the carbs. If the bushing is badly worn, it should be possible to fabricate new bushings for the shaft that will provide a better sealing. On the second picture I have made a temporarily seal out a piece of plastic that I have glued on to the edge of the carb body outside the shaft. I have done this for a test only, and there was a small improvement in the low rpm area. But if the butterfly shaft is worn, it will also leak on the inner side of the carbs, and it is very difficult to fix that leak in an easy way, so it's hard to tell if there is much to gain all in all.

More pictures of the 1974-1975 carbs

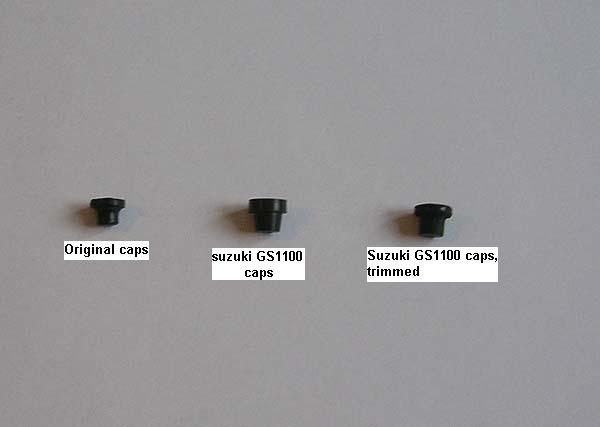
This is the rubber caps that are covering the pilot jets. They are no longer available, but I have bought caps for Suzuki GS 1100 carbs and trimmed them till they fit with a hobby file.

And you will find more details about the 400 carbs here.
1978-1979 Z400B1, B2 ,G and H(LTD) jetting list and ajustment specs.
1978-1979 KZ400 B1, B2, C and H1 (LTD) jetting list and adjustments specs.
Fuel filters
I would also recommend
fitting fuel filters on the fuel lines between the petcock and the carbs. That
will save you for a lot of carb trouble. And drain the float bowls at every
service. And I check and readjust the idle mixture at every service.
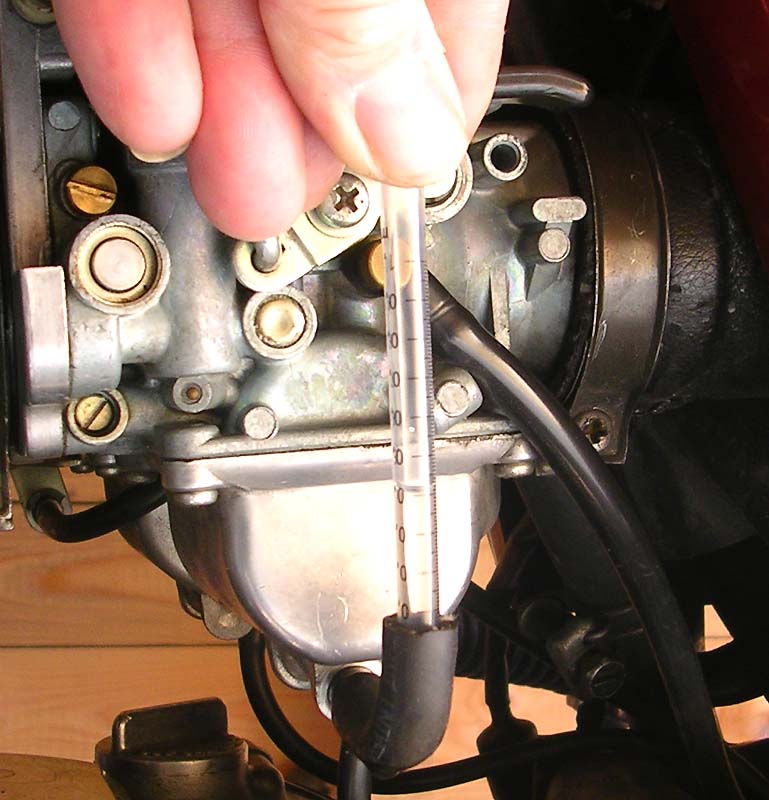
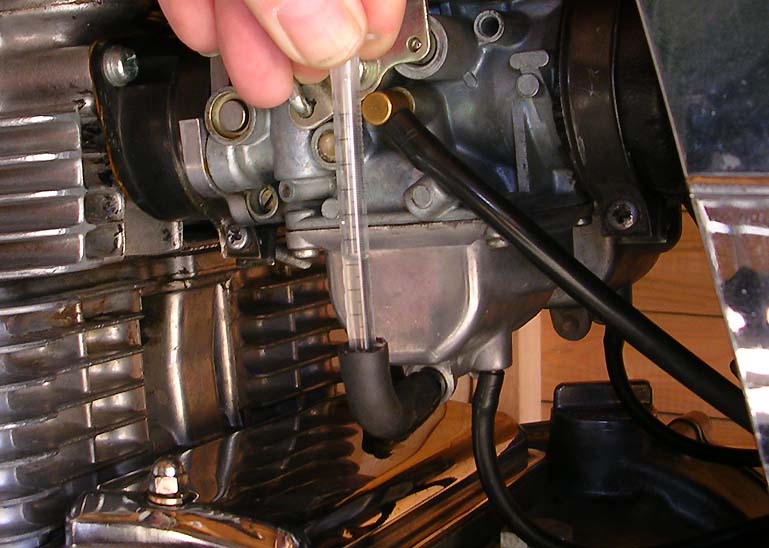
I also balance the carbs
from time to time. It secures a smooth running and will reduce rattling from
the primary chain at idle. A carb balancing tool is expensive to buy but will
last for many years. I have bought a Morgan
Carbtuner and I have never regretted the investment. It is very easy to
use. And you can really feel the difference when the carbs are balanced. You
will find some pictures of the process here.
More about motorcycle carbs here.
And there are more links to sites about carbs here.
And for those who would
like to make their own carb balancing tool, take a look here.
The place to buy the cheapest replacement diaphragms for carbs will be here
or here
Here you will find some
tip about carb
cleaning.
And this site have got
many useful tips about tuning CV carbs: CV
Carb Tuning
And here
is an instruction with pictures about how to balance the carbs for the 1974-1976
D and S models, and the 1977 A1.
I got a unique chance to
find out how these bikes really ran when they were new this summer (2006).
This spring I purchased a set of brand new 75 model carbs from a guy in England.
They came with the stock factory jetting, and had never been installed on a
bike before. I installed them on an engine with only 5000 miles after a re-bore,
and a valve job and with a measured compression of 152~153psi on each cylinder
(stock is 142~156psi with a service limit of 110psi), so it was close to having
a new bike. With a stock air filter the average mileage is 62~63mpg and at its
best 68mpg. When that is said, I have also had an aftermarket electronic ignition
system that does improve the gas mileage a little. The improvement is approx
8~10% compared to a points ignition system. Power is good and there are no running
problems, but the engine is cold blooded and needs to get warm before it pulls
well in the mid range. I also tried to run it without the air filter installed
just as a test, and I got a huge flat spot in the lower and the mid range rpm
area.
A simple fuel level gauge for float adjustment
These are the parts I have used:
1 small syringe, I piece from a fuel hose,1 6mm adapter for a carb synch tool, 2 hose clamps (not shown on the pictures below)
This is the original Kawasaki fuel level gauge.

This is my homemade tool:

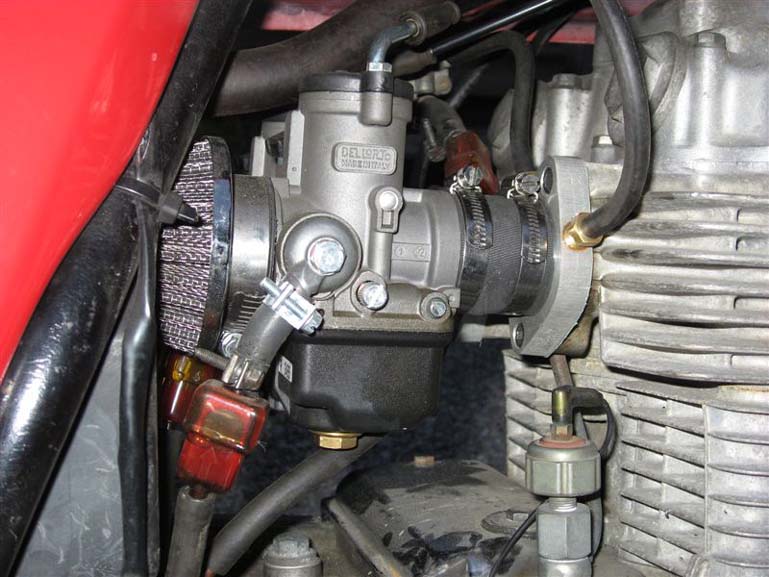
Aftermarket carbs
Tip about carbs for the
KZ400
I got this tip from a Norwegian
Z400 owner, Inge Serigstad, who owns a 1981 Z400.
He has bought two Dell’Orto PHBH 30mm and fitted to his bike. He told
me they are working very well. These carbs are originally for the Moto Guzzi
V65, and there is one right hand and left hand carb. He has fabricated metal
intake manifolds with short pipe stubs in aluminium, and has used 35mm radiator
hoses as intake rubbers. I haven’t gotten the list about what jets sizes
he is running, but I will post it as soon as I get it.
On the pictures you can see a hose connected to the intake manifold. He has
one at each manifold and they are connected to two small vacuum gauges installed
on the bike. That way he can always see if the carbs are synched properly.
This is where he bought them:
Matt Cooper
eurocarb ltd.
256 Kentwood Hill
Tilehurst
Reading, UK
RG31 6DR
Tel +44 (0)118 943 1180
Fax +44 (0)118 943 1190
sales@dellorto.co.uk
http://www.racecar.co.uk/dellorto/
And this company will set up the carbs with jets and jet needles siutable for the Z/KZ400.
Compression Test
When you do a compression
test with a compression tester, the throttle should be fully open. And if there
is a difference between the cylinders that is more than 10%, there is a problem
with leaking valves or leaking piston rings on the cylinder with the lowest
reading. Pour a teaspoon with engine oil in to the spark plug hole on that cylinder
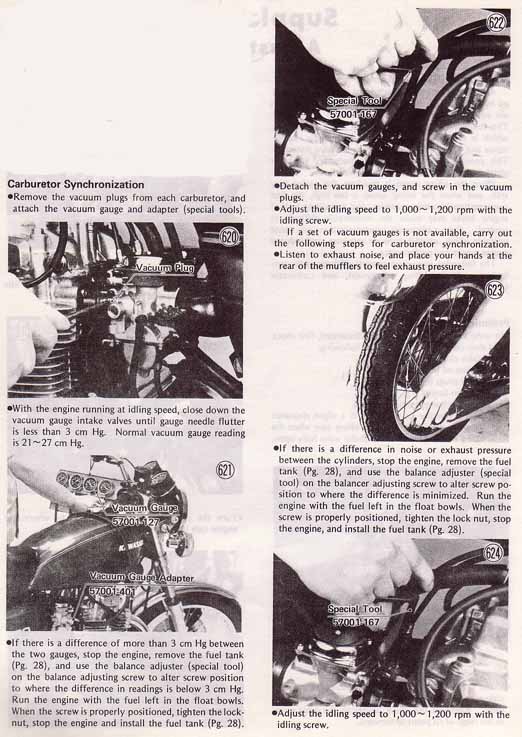
and make a new test. If the reading increases there is a piston ring problem.
If it remains the same it is a valve problem.
A compression test should be made at every tune up and recorded. That way it
is easy to see if there is a sudden drop in the compression, and the problem
can be corrected.
The compression specifications and the service limits are found under Tune up
specifications on the top of this page. Picture 11.
Reading spark plugs


Reading spark plugs is
the best method to measure proper main jet selection. Proper detection of correct
jetting keeps potential problems from occurring well in advance of the damaging
results that could take place. Reading plugs should only be done by doing a
"Throttle Chop" (a hard wide open throttle run followed immediately
and simultaneously by killing the ignition, pulling in the clutch, and closing
the throttle, coasting to a stop and pulling the plugs out for inspection).
The plug on the left indicates an overly lean condition, although it looks brand
new. Further symptoms would include slight specs appearing on the surfaces indicating
pre-ignition. The centre plug shows near perfect running condition of a light
ash colouring on the porcelain which is a normal result of burning gasoline.
The plug on the right shows excessive oil burning (black gritty surface) and
overly rich fuel mixture (black, smooth shiny surfaces).
More about reading spark
plugs here.
Electronic ignition
I have fitted an electronic ignition system on my 400. It is a Boyer Brandsen Mark 3 system. I bought this the year after I bought the bike, and I bought it from a Norwegian parts supplier who had this one unit in his stock. I have had this on my bike since it was bought in 1997 and it has always worked great. You can read the fitting instruction here. And Boyer Electronics can be contacted here.
This is the system I have on my 400.

There is also another producer
that are making an electronic ignition system for the KZ400: Newtronics.
And there are KZ400 owners that have fitted the electronic ignition system from
the 1981 - 1984 models to older 400's with success. Details about it can be
found here.
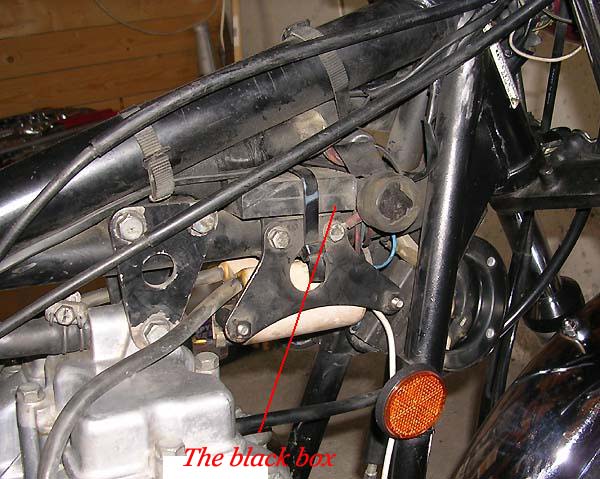
Rectifier/voltage regulator
On the 1974 to 1977 models you can use the voltage regulator from the 1976-1977 KZ650 models (before the B2). On the 1978 and 1979 models you can use the regulator/rectifier unit from the 1978-1979 KZ650 (B2 and after). There is also a company in USA that is building cheap replacement rectifiers, regulators and regulator/rectifier units. This is their website.
Light switch
I have also fitted a main light switch to my bike. I found that sometimes it is an advantage that you can turn on the ignition without turning the headlight on. I have done this very simple by putting the switch on the earth wire to the head light. I have used a very small switch that I have fitted in to the panel next to the ignition lock.
For finding faults in the electric system, these tips will be helpful
Oil pressure
The oil pressure should be: 4kg/cm at 4000 rpm and with a oil temrature of approximately 80 degrees C (176F)
Oil Cooler
If anyone wants to fit an oil cooler to their KZ400/440 you can check it out here.
Oil leaks
The 1974 to 1977 models
was known to leak oil from the top end. This was a problem that Kawasaki solved
for their customers by replacing all the gaskets and o-rings in the top end,
and they also replaced the cylinder studs at the same time. I have got one of
those kits in my spare part shelf, but I have not had any use for it yet.
I have dismantled the top end on both my engines and when I install the cylinder
head cover, I smear a thin layer with blue silicone instant gasket on all the
stud o-rings and on the head cover o-ring. This should make the top end fairly
oil tight. If you do this, be careful not and don't use too much silicone. If
you overdo the amount of silicone, the excess on the inside of the cover could
work loose and clog up the oil ways.
The image shows where the top end is prone to leak on the 1974-1977 KZ400 top
ends if the bike has been sitting for a number of years

Replacing the o-rings for the rocker arm shafts, 1974-1977 engines.
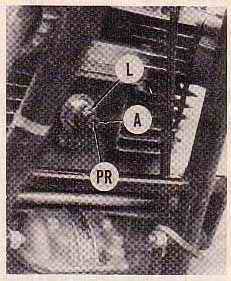
The o-rings for the rocker arm shafts are prone to leak on the 1974 to 1977 models. If you need to replace them you can either take the rocker cover off, or as I have done, replace them without taking the cover off. You must remove the valve adjustment covers, the adjustment locknuts and the plates. Then screw the locknuts loose on the shafts and wrap a piece of cloth around the nut and use a pair if pliers and pull the shaft out. Replace the o-rings and push the shafts back in position. If you are careful, there is no problem to make them entering the rocker arms inside the rocker cover. When you adjust the valves afterwards, remember to position the shafts with the punch mark on the end of the screw facing inwards, against the +/- marking on the plates.
Broken cylinder stud
I did break one of my cylinder studs once, but I was able to work it loose by grinding it and grab it with a pair of pliers. After that i found a tip that might be better because the stud that are left in the crankcase are normally fixed with liquid thread lock and are hard to get out. This is the tip: Put a washer on the stud that are left in the crankcase and weld it to top of the stud, then weld a nut to the washer, and you should be able to loosen the stud with a wrench and unscrew it. I have not tried this myself. So I can't tell if this will actually work.
Gaskets
For those who would like to produce their own gaskets, there is a very good guide here.
Seat Covers
I replaced the seat cover on my 1975 modell in the summer 2003. It is not difficult, but take your time and be careful not to stretch it to much, you can see a result of that on the picture taken of my bike back in 1997. The hump on the rear end of the seat will be deformed. That is one of the reasons why I replaced it again. I bought my seat cover at BitzForBikes in UK. The prosess is described here.
Starter motor
All the KZ400 and KZ440 models from 1974 to 1983 shear the same starter motor as a unit, but the later starter motors have got 4 carbon brushes, the early models have got 2.
Wheel bearings
Here you will find an instruction about how to replace wheel bearings. And you will find more info about the coding of the bearings here.
Rear wheel damper cush drive/shock damper
A fellow member on the KZrider forum came up with a gret tip about repairing the rear wheel cush drive/shock dampers. You will find it here.
Chain and sprockets
I have replaced the chain
and sprockets twice since I bought the bike in 1996. Both times I have used
JT sprockets and a
EK 530 KVD-O, o-ring chain.
That is a chain with a riveted master link. The first set of chain and sprockets
lasted for 24000 miles.
I lubricate the chain at
least every 150 miles, and when ever I have washed the bike or been riding on
wet roads. I clean it from time to time with a degreaser. For lubricating the
chain I use a spray on lubrication, I have used several brands, and it seems
that there are no big difference between them. My favourite though, would be
the CRC
chain lube. It is not the cheapest, but the size of the spray can makes
it easy to bring along. In fact, I can store it in the tool box under the seat.
Belt Drive
This is for those who have got a belt driven 400/440 and want to convert to chain and sprockets. The only part that is different between the belt and the chain driven models is the chain guards. The pulleys and the sprockets are interchangeable, and will bolt straight on either way.
Suspension
There were some complaints about the suspension in several road tests back in the 70's. And it was described how this influenced on the road holding. In a long term test made by Cycle World back in 1974, they improved the front damping by installing a KX 125 fork kit (kit number 144) which extended the fork travel by one inch. The rear shocks were replaced with Koni shocks with adjustable preload, and they claimed that this was a great improvement to road holding.
Rear shock pre load setting

Front suspension
Windscreens
I have fitted a small windscreen
to my bike, and since I like to cruise around at speeds between 50 and 70 mph
it doesn't worry me if the screen should make it difficult to reach top speed.
I think that the advantages are fare to great. One thing to remember when you
add a handlebar mounted windscreen is that it can influence on the road holding.
Heavy wind and the wind pressure you get when you meet large trucks can make
the bike unstable. As long as you are aware of the problem, you can live with
it. The screens also produce some wind noise, and it is noticeable, and I always
use earplugs when I drive. And you will hear the engine sounds better.
The advantages with the screen are that you get rid of the air pressure on your
chest, and if it rains you don't get the rain on your upper body and your face.
It also keeps the bugs away. And if you, like I do, are riding early in the
spring and late fall, it will keep some of the cold air away.
Winter storage
You will find some very good advise about winter storage here.
In addition to the tips
I have linked to, I would like to add a couple of things. Since I live in a
country with a tough climate, and my bike is stored in a cold garage I always
spray the whole bike with CRC-556, Quaker State QS-14, or something similar
before I put the bike away for the winter. I cover the bike completely with
the stuff. And in the spring I wash it off with a mild degreaser and water.
I also spray in to the exhaust mufflers. I never remove them from the bike,
but I spray CRC in to the mufflers from the rear, and I keep on spraying till
I see the CRC begin to drip out from the drain holes in the front end of the
mufflers. I have also tried WD40, but I didn't like it. When it dries up it
turns in to some sort of wax that is very hard to remove from the bike. And
I'm not sure that the WD40 have got the same protective quality as the CRC.
And I do drain the float
bowls before storage, but I fill them with petrol again, and let it sit over
the winter, and drain them once more in the spring. I think it is better to
have petrol in the carbs rather then letting them dry out over the winter. I
also fill the fuel tank completely full before storage
Starting the bike after winter storage
Many bike owners have experienced
that the bike is running fine when they put it away for the winter, and that
it is very hard to start in the spring. And this is also my experience.
This is the method I have found to be the best for my bike when I am starting
the bike for the first time after the winter storage. Usually it can be a pain
to start these bikes after a long storage. And if they are stored cold during
the winter, it is even harder to start.
And those last three points will also work great if there is any cold start
problem. The KZ400/KZ400 is known to be "cold-blooded" and a bit difficult
to start when it is really cold.
1. Charge the battery.
2. Drain the carbs.
3. Take out the spark plugs.
4. Crank the engine a couple
of times.
5. Warm the engine up with
an electric heating fan for 1-1 1/2 hour.
6. Install a set of new,
or dry and clean spark plugs. If they have been stored inside your house, they
will work even better. Do not use the ones that were in the bike when stored.
And now the bike should be easy to start up.